Flooring Installation | East Valley
January 29th, 2026 | by Nick Kayser | Posted in
At Mustache Approved Remodeling, we provide professional flooring installation throughout the East Valley, serving homeowners in Gilbert, Chandler, Mesa, Tempe, Scottsdale, and Ahwatukee.
New flooring transforms your home more dramatically than almost any other upgrade. It affects every room, impacts daily comfort, and sets the foundation for your entire interior design. But beautiful flooring that fails within a few years due to improper installation, inadequate subfloor preparation, or wrong material selection is worse than no upgrade at all.
As a licensed design-build contractor (ROC #309760), we approach every flooring project with the same attention to preparation, material quality, and installation precision that we bring to our bathroom and kitchen remodeling projects. The work beneath the surface matters just as much as the finished floor you walk on. See your finished space before we build with our Virtual Showroom 3D design consultation.
For detailed answers about flooring options, timelines, and costs, visit our Flooring FAQs page.
Why Professional Flooring Installation Matters
Flooring installation appears straightforward—lay down material, cut edges, done. But professional installation involves critical preparation and techniques that determine whether your floors perform beautifully for decades or fail within years.
What Can Go Wrong with Improper Installation
We’ve seen countless flooring failures from DIY projects and budget contractors:
- Planks separating, buckling, or warping within months
- Tiles cracking due to inadequate subfloor preparation
- Squeaky floors from improper underlayment
- Moisture damage from skipped vapor barriers
- Uneven surfaces causing tripping hazards
- Gaps appearing at walls and transitions
- Grout cracking and crumbling prematurely
- Complete floor replacement needed within 3-5 years
These failures almost always trace back to shortcuts in preparation, wrong material selection for the application, or improper installation techniques.
What Professional Installation Provides
Professional flooring installation ensures:
- Thorough subfloor inspection and preparation
- Proper moisture testing and vapor barriers where needed
- Correct underlayment selection and installation
- Material acclimation to your home’s environment
- Precise layout planning for visual balance
- Professional-grade tools and techniques
- Proper expansion gaps and transitions
- Clean, finished edges and details
- Warranty protection (many manufacturers void warranties for improper installation)
The difference between professional and amateur flooring installation becomes obvious over time—usually when it’s too late to fix without complete replacement.
Flooring Options for Arizona Homes
Arizona’s climate—extreme heat, low humidity, and temperature swings—creates specific challenges for flooring materials. We help homeowners select options that perform well in our desert environment.
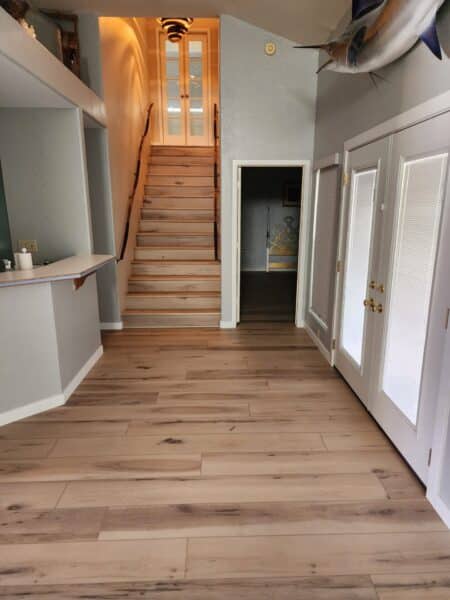
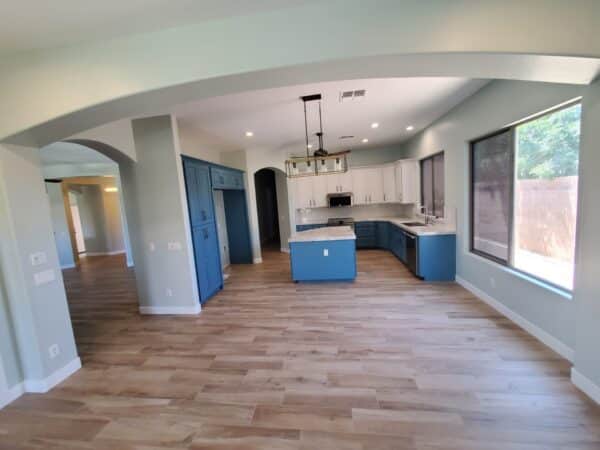
Luxury Vinyl Plank (LVP) Flooring
Luxury vinyl plank has become the most popular flooring choice for East Valley homes, and for good reason.
What is LVP?
LVP consists of multiple layers engineered for durability and water resistance:
- Wear layer (top) – Clear protective coating resisting scratches and scuffs
- Design layer – High-resolution image layer creating wood or stone appearance
- Core layer – Rigid or flexible core providing stability and structure
- Backing layer – Provides cushioning and moisture protection
Modern LVP is virtually indistinguishable from real hardwood at a glance, with realistic grain patterns, textures, and color variations.
Why LVP Works Well in Arizona
- 100% waterproof – Handles spills, pet accidents, and humidity changes
- Temperature stable – Won’t expand/contract dramatically with Arizona heat
- Scratch resistant – Stands up to pets, kids, and daily wear
- Low maintenance – Simple cleaning, no refinishing needed
- Comfortable underfoot – Warmer and softer than tile
- Cost effective – Less expensive than hardwood with similar appearance
Best Applications for LVP
- Whole-home flooring installations
- Kitchens and bathrooms (water resistance)
- Living areas and bedrooms
- Homes with pets or children
- Rental properties (durability)
- Over concrete slabs (moisture tolerance)
LVP Quality Levels
Not all LVP is created equal. We install premium LVP products with:
- Rigid core construction (SPC or WPC) for stability
- Minimum 20mil wear layer for residential durability
- Attached underlayment for easier installation and better feel
- Quality locking systems that stay secure long-term
- Realistic textures and patterns that don’t look “plastic”
Budget LVP (often sold at big box stores) uses thinner wear layers, flexible cores, and inferior locking systems that fail within a few years.
Tile Flooring
Tile remains a classic choice for Arizona homes, offering unmatched durability and design flexibility. Porcelain tile flooring offers unmatched durability and works beautifully throughout Arizona homes—kitchens, bathrooms, living areas, and whole-home installations.
Types of Tile Flooring
- Porcelain tile – Dense, durable, low water absorption (best for most applications)
- Ceramic tile – More affordable, good for low-traffic areas
- Large format tile – 12×24, 24×24, or larger for modern, minimal grout lines
- Wood-look tile – Porcelain planks mimicking hardwood appearance
- Natural stone – Marble, travertine, slate for luxury applications
Why Tile Works Well in Arizona
- Stays cool underfoot – Natural temperature regulation in hot climate
- Extremely durable – Handles heavy traffic for decades
- Waterproof – Perfect for bathrooms, kitchens, entryways
- Low maintenance – Easy cleaning, no refinishing
- Design flexibility – Endless patterns, colors, and layouts
- Increases home value – Perceived as premium flooring
Tile Installation Requirements
Proper tile floor installation requires:
- Flat, stable subfloor (no flex or movement)
- Appropriate backer board over wood subfloors
- Proper thinset selection for tile type and size
- Tile leveling systems for large format tiles
- Correct grout selection and application
- Expansion joints in large areas
- Proper curing time before use
For detailed information about our tile installation process and leveling systems, visit our shower tile installation page.
Hardwood Flooring
While less common in Arizona due to climate considerations, hardwood flooring remains desirable for certain applications.
Hardwood Considerations for Arizona
Arizona’s low humidity (often below 20%) creates challenges for solid hardwood:
- Wood shrinks in low humidity, creating gaps between planks
- Dramatic humidity swings cause expansion/contraction
- Air conditioning and heating accelerate moisture changes
- Solid hardwood may require whole-home humidification
Engineered Hardwood Alternative
Engineered hardwood performs better in Arizona climates:
- Real wood top layer (looks and feels like solid hardwood)
- Plywood core resists humidity changes better than solid wood
- More dimensionally stable in Arizona conditions
- Can be installed over concrete slabs
- Still requires careful humidity management
We discuss hardwood options during consultation and help homeowners understand the maintenance requirements for Arizona installations.
Other Flooring Options
Laminate Flooring
Laminate offers a budget-friendly alternative to LVP but with limitations:
- Not waterproof (water damage causes swelling)
- Less durable than quality LVP
- Can sound hollow underfoot
- Not recommended for bathrooms or kitchens
For most Arizona homeowners, LVP provides better value than laminate.
Carpet
We don’t install carpet but can coordinate with trusted carpet specialists for whole-home projects requiring multiple flooring types.
The Professional Flooring Installation Process
Initial Consultation and Planning
Every flooring project begins with thorough consultation:
Space Assessment
We evaluate:
- Total square footage and room layouts
- Current flooring type and condition
- Subfloor type (concrete slab vs. wood subfloor)
- Moisture concerns or history
- Traffic patterns and wear expectations
- Transition points between rooms and flooring types
- Furniture and appliance considerations
Material Selection
We help you choose flooring based on:
- Your aesthetic preferences and design goals
- Durability requirements (pets, kids, traffic level)
- Moisture exposure (bathrooms, kitchens, entryways)
- Comfort preferences (temperature, cushioning)
- Maintenance expectations
- Budget considerations
Layout Planning
We plan installation details including:
- Plank or tile direction for visual flow
- Pattern selection (straight lay, diagonal, herringbone)
- Starting points for balanced appearance
- Transition locations between rooms
- Edge treatments and trim details
Clear Pricing and Timeline
We provide detailed estimates covering all work, materials, removal, preparation, and installation so you understand complete project scope.
Existing Flooring Removal
Most projects require removing existing flooring:
Carpet Removal
- Carpet and pad removed and disposed
- Tack strips removed (unless reinstalling carpet elsewhere)
- Staples and adhesive residue removed from subfloor
- Subfloor cleaned and inspected
Tile Removal
- Tile broken up and removed (labor-intensive process)
- Thinset and adhesive scraped or ground from subfloor
- Subfloor leveled if needed
- Dust containment measures throughout
LVP/Laminate Removal
- Planks removed and disposed
- Underlayment removed
- Adhesive removed if glue-down installation
- Subfloor cleaned and inspected
Hardwood Removal
- Hardwood planks removed
- Nails or staples removed from subfloor
- Adhesive removed if applicable
- Subfloor assessed for damage
Removal timeline varies significantly based on existing flooring type. Tile removal over concrete is particularly labor-intensive.
Subfloor Preparation
Subfloor preparation is the most critical phase of any flooring installation. Shortcuts here cause failures later.
Subfloor Inspection
We thoroughly inspect for:
- Structural integrity (no soft spots, rot, or damage)
- Flatness (within manufacturer tolerances)
- Squeaks or movement (must be corrected)
- Previous water damage or mold
- Proper fastening to joists (for wood subfloors)
Moisture Testing
Moisture testing is essential, especially for:
- Concrete slabs (common in Arizona)
- Below-grade installations
- Areas with previous water issues
- Any installation with moisture-sensitive materials
We use professional moisture meters to verify subfloor moisture levels are within acceptable ranges for your flooring material.
Subfloor Repairs
Common repairs include:
- Replacing damaged plywood sections
- Securing loose boards to eliminate squeaks
- Adding screws to tighten subfloor to joists
- Repairing concrete cracks or damage
- Treating any mold or moisture issues
Leveling
Flat subfloors are essential for quality installation:
- Self-leveling compound for concrete imperfections
- Floor patching compound for localized low spots
- Grinding high spots if necessary
- Verification with straightedge before proceeding
Most flooring manufacturers specify maximum variation (typically 3/16″ over 10 feet). We verify subfloors meet these requirements.
Vapor Barriers and Underlayment
Depending on installation type:
- Vapor barriers over concrete to prevent moisture transmission
- Underlayment for cushioning, sound reduction, and minor imperfection bridging
- Combined vapor barrier/underlayment products where appropriate
- Proper overlap and sealing of seams
Material Acclimation
Flooring materials must acclimate to your home’s environment before installation:
Why Acclimation Matters
- Materials stored in warehouses have different temperature/humidity than your home
- Installing without acclimation causes expansion or contraction after installation
- Proper acclimation prevents gaps, buckling, and other failures
Acclimation Requirements
- LVP: 48 hours in installation environment (less critical than hardwood)
- Hardwood: 3-7 days minimum, following manufacturer specifications
- Tile: No acclimation needed
- Laminate: 48-72 hours in installation environment
We schedule material delivery to allow proper acclimation before installation day.
Professional Installation
LVP Installation Process
- Final layout planning and first row positioning
- Spacers placed at walls for expansion gap
- Planks installed with proper staggering pattern
- Click-lock joints engaged fully at each plank
- Cuts made precisely at walls, obstacles, and transitions
- Transitions installed at doorways and flooring changes
- Quarter round or base shoe installed to cover expansion gaps
Tile Installation Process
- Layout lines established for straight, balanced installation
- Thinset mixed to proper consistency
- Thinset applied with correct trowel size for tile dimensions
- Tiles set with consistent spacing using tile leveling system
- Cuts made with wet saw for clean edges
- Grout applied after thinset cures (24-48 hours)
- Grout cleaned and sealed (for cement-based grout)
- Transitions and thresholds installed
Hardwood Installation Process
- Vapor barrier installed if over concrete or crawlspace
- First row established straight and secure
- Planks nailed or stapled with proper fastener schedule
- Staggered joints for structural integrity and appearance
- Expansion gap maintained at all walls
- Transitions and thresholds installed
- Final sanding and finishing (if unfinished hardwood)
Finishing Details
Professional installation includes attention to every detail:
Transitions
- T-moldings between same-height floors
- Reducers between different-height floors
- Thresholds at exterior doors
- Stair nosings for staircase applications
Trim Work
- Quarter round or shoe molding at baseboards
- New baseboards if existing are damaged
- Caulking at trim/floor transitions
- Touch-up paint on trim if needed
Final Cleanup
- All installation debris removed
- Floors cleaned of dust and residue
- Final inspection and walkthrough
- Care and maintenance instructions provided
Timeline for Flooring Installation
Flooring project timelines vary based on scope, material type, and subfloor conditions.
Single Room LVP Installation (150-300 sq ft)
- Day 1: Removal of existing flooring, subfloor prep, begin installation
- Day 2: Complete installation, transitions, trim
Whole Home LVP Installation (1,000-2,000 sq ft)
- Days 1-2: Removal of existing flooring throughout
- Days 2-3: Subfloor preparation and repairs
- Days 3-5: LVP installation room by room
- Day 5-6: Transitions, trim, and final details
Tile Floor Installation (Kitchen or Large Room)
- Day 1: Existing flooring removal
- Day 2: Subfloor preparation and leveling
- Day 3-4: Tile installation
- Day 5: Grout application and curing (24-48 hour cure before use)
- Day 6: Transitions, trim
Whole Home Tile Installation
- Week 1: Removal and subfloor preparation throughout
- Week 2: Tile installation in main areas
- Week 3: Complete remaining areas, grout, and finishing
Additional time may be needed for extensive subfloor repairs, complex patterns, or coordination with other remodeling work.
For flooring installed as part of larger projects, visit our whole home remodeling page.
Cost of Flooring Installation
Flooring costs vary based on material selection, square footage, removal requirements, and subfloor conditions.
Material Cost Ranges (Per Square Foot)
- LVP (budget): $2-4 per sq ft
- LVP (mid-range): $4-7 per sq ft
- LVP (premium): $7-12 per sq ft
- Porcelain tile (standard): $3-8 per sq ft
- Porcelain tile (premium/large format): $8-15 per sq ft
- Natural stone: $10-30+ per sq ft
- Engineered hardwood: $6-15 per sq ft
- Solid hardwood: $8-20+ per sq ft
Installation Cost Ranges (Per Square Foot)
- LVP installation: $2-4 per sq ft
- Tile installation: $6-12 per sq ft
- Hardwood installation: $4-8 per sq ft
Additional Costs
- Existing flooring removal: $2-4 per sq ft (tile removal highest)
- Subfloor repair: $2-5 per sq ft if needed
- Leveling compound: $2-4 per sq ft if needed
- Transitions and trim: $200-500 depending on scope
Typical Project Totals
- Single room LVP (200 sq ft): $1,500-3,000
- Whole home LVP (1,500 sq ft): $8,000-15,000
- Kitchen tile floor (150 sq ft): $2,500-5,000
- Whole home tile (1,500 sq ft): $18,000-35,000
- Whole home engineered hardwood (1,500 sq ft): $15,000-30,000
During consultation, we provide detailed pricing based on your specific project, material selections, and any preparation requirements.
Maintaining Your New Floors
Proper maintenance extends flooring life and preserves appearance.
LVP Maintenance
Daily/Weekly:
- Sweep or vacuum regularly (use hard floor setting)
- Wipe spills promptly
- Use doormats at entries to reduce debris
Monthly:
- Damp mop with LVP-approved cleaner
- Avoid excessive water
- Check for any damaged planks
Ongoing:
- Use furniture pads under heavy items
- Avoid dragging furniture across floors
- Keep pet nails trimmed
- Avoid rubber-backed mats (can discolor LVP)
Tile Maintenance
Daily/Weekly:
- Sweep or vacuum regularly
- Damp mop with pH-neutral tile cleaner
- Wipe spills promptly
Monthly:
- Deep clean grout lines
- Check for cracked or loose tiles
- Inspect grout for wear
Annually:
- Reseal grout (cement-based grout)
- Reseal natural stone tiles
- Professional deep cleaning if needed
Hardwood Maintenance
Daily/Weekly:
- Sweep or vacuum with hard floor attachment
- Wipe spills immediately (water damages wood)
- Use doormats at all entries
Monthly:
- Damp mop with hardwood-specific cleaner
- Avoid excessive water
- Check humidity levels (important in Arizona)
Ongoing:
- Use furniture pads
- Consider whole-home humidification for Arizona climate
- Refinish every 7-10 years as needed
Frequently Asked Questions About Flooring Installation
How long does flooring installation take?
Timeline depends on scope and material. Single room LVP takes 1-2 days. Whole home LVP takes 5-7 days. Tile installation takes longer due to curing time—a whole home tile project may take 2-3 weeks.
Can you install new flooring over existing flooring?
Sometimes. LVP can often be installed over existing hard surfaces if they’re flat, stable, and in good condition. Tile typically requires removal of existing flooring for proper installation. We evaluate during consultation and recommend the best approach for your situation.
Do I need to move my furniture before installation?
Yes. Rooms should be cleared before installation day. We can discuss furniture moving options during consultation—some homeowners handle this themselves, while others prefer we coordinate moving.
How long before I can walk on new floors?
LVP: Immediately after installation. Tile: Light foot traffic after 24 hours, normal use after 48-72 hours (grout needs curing time). Hardwood: 24 hours for engineered, varies for solid hardwood with applied finish.
Is LVP waterproof?
Quality LVP with rigid core construction is 100% waterproof. The planks themselves won’t be damaged by water. However, water can seep between planks if submerged, so standing water should still be avoided and cleaned promptly.
What’s the difference between LVP and laminate?
LVP is 100% waterproof and more durable. Laminate has a wood-fiber core that swells when exposed to moisture. For Arizona homes, especially in kitchens and bathrooms, LVP is the better choice despite slightly higher cost.
Should I choose LVP or tile?
Both are excellent for Arizona. LVP is warmer underfoot, more comfortable for standing, quieter, and typically less expensive. Tile is more durable long-term, stays cooler (good for Arizona heat), and offers more design options. We help you choose based on your priorities during consultation.
How do I know if my subfloor needs repair?
Signs include: squeaking when walking, soft or spongy spots, visible damage, previous water issues, or uneven surfaces. We thoroughly inspect subfloors before every installation and identify any repairs needed.
Do you install flooring during kitchen or bathroom remodels?
Yes. Flooring is often part of larger remodeling projects. We coordinate flooring installation with other work for seamless results. Visit our kitchen remodeling and bathroom remodeling pages for more information.
What about flooring for bathrooms?
For bathroom floors, we recommend tile or LVP due to moisture exposure. Tile offers superior water protection and durability. LVP provides a warmer, more comfortable surface. We never recommend carpet or standard laminate in bathrooms. For shower floors specifically, see our shower tile installation page.
Can you match flooring to my existing floors in other rooms?
We can often find close matches for LVP and tile. Exact matches for discontinued products aren’t always possible. For whole-home cohesion, many homeowners choose to install new flooring throughout rather than matching existing materials.
Do you offer warranties on flooring installation?
Yes. Our installations include workmanship warranty covering installation quality. Flooring materials carry separate manufacturer warranties. We provide documentation for both.
Why Choose Mustache Approved for Flooring Installation
Licensed General Contractor (ROC #309760)
As a licensed, bonded, and insured general contractor, we handle complete flooring projects including any subfloor repairs, structural issues, or coordination with other trades. You work with one accountable contractor from start to finish.
Comprehensive Preparation Standards
We invest proper time in subfloor inspection, moisture testing, repairs, and leveling. This preparation phase determines long-term flooring performance—we never rush or skip critical steps.
Quality Materials
We install premium flooring products from reputable manufacturers—not big-box budget materials with thin wear layers and inferior construction. Quality materials combined with professional installation deliver lasting results.
Coordination with Other Projects
Flooring often connects with bathroom remodels, kitchen remodels, and whole-home renovations. We coordinate flooring installation seamlessly with other work, ensuring proper transitions and timing.
Proven Process
Our 6-step remodeling process ensures clear communication, quality execution, and no surprises from consultation through final walkthrough.
Transparent Pricing
We provide detailed written estimates covering removal, preparation, materials, installation, and finishing. No hidden fees or surprise charges.
Serving the East Valley
We proudly provide professional flooring installation throughout the East Valley:
Ready to Discuss Your Flooring Project?
Whether you’re updating a single room or installing new flooring throughout your home, contact Mustache Approved Remodeling to schedule a consultation. We’ll evaluate your space, discuss material options, and provide a clear plan for your flooring installation.
Additional Resources:
- Flooring FAQs – Common questions answered
- View Our Flooring Project Gallery – See completed installations
- General Contractor – Licensed general contractor for the East Valley
- Bathroom Remodeler – Full-service bathroom remodeling contractor for the East Valley
- Tile Flooring Installation – Premium porcelain tile floors for every room
- Virtual Showroom – See your finished space before we build
- Whole Home Remodeling – Flooring as part of larger projects
- Kitchen Remodeling Services – Kitchen flooring options
- Kitchen Remodeler – Full-service kitchen remodeling contractor for the East Valley
- Tile Contractor – Professional tile installation for showers, floors, backsplashes, and tub surrounds
- Bathroom Remodeling Services – Bathroom flooring options
- Schedule a Consultation Today
Mustache Approved Remodeling
ROC #309760 | Licensed, Bonded, Insured
Serving Gilbert, Chandler, Mesa, Tempe, Scottsdale & Ahwatukee
